

How do I upload a file or model?

Here is a tutorial to upload a file or model.
-
Step 1:
Make your model. Save your model.
In SolidWorks select File Pack and Go….
-
Step 2:
When the dialog box opens select the options
1. Save to a zip file
2. Flatten to a single folder
3. Then select Browse
-
Step 3:
A new dialog box will open when you select… Select Browse
1. Select file location
a. Note where you are saving the zip file.
2. Add name
3. Select Save
-
Step 4:
The previous dialog box will become the primary focus dialog box. Select Save.

-
Step 5:
Save a rendering.
Make a quick render of the part. One easy method to use if you do not have a detail rendering application is to copy the screen image.
Select View Screen Capture Image Capture
-
Step 6:
Open windows accessory Paintbrush application
Select Paste
-
Step 7:
Use the select tool around your picture and…

-
Step 8:
Crop your picture.

-
Step 9:
Save your picture.

-
Step 10:
Open your browser and log into GrabCad.com

-
Step 11:
Upload your model.
Select big red button “Upload a CAD model”
-
Step 12:
The “Upload your CAD model” screen will show. Select the big red button “Upload”

-
Step 13:
The select files dialog box will open. Find your zip file and select.
Click on open.
-
Step 14:
Your file will upload and the screen will open for the supporting details.

-
Step 15:
Click on the “Other” drop menu to select the file type. The version menu box may open. If so select version. Do NOT hit the “x” button.

-
Step 16:
Scroll down the page and add your additional details for the model.
Model Name
Description
Add Tags
Url to Video
Select categories
Permissions (You can allow other members to save their renderings of your model and other formats. You have the control to delete any renderings or formats you do not allow.)
After you have the details as you want them select the big red button “Publish Model”
-
Step 17:
The screen will update and allow you to View Selected Model. Select the red button to view uploaded model.

-
Step 18:
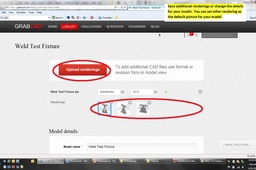
Add your rendering to the model to give others a preview.

-
Step 19:
Scroll down the page and select Renderings. The screen will update.

-
Step 20:
Click the Browse button and find your picture file.

-
Step 21:
Click the upload button and the rendering picture will be loaded.

-
Step 22:
The view will refresh and you will see your rendering ad the default view.
You have control of your model in the upper right corner you can use the edit or delete buttons to make changes to your upload.
To save additional renderings select Edit.
-
Step 23:
Save additional renderings or change the details for your model. You can set other rendering as the default picture for your model.

